🌱 오늘의 주제 : 포트원 결제 - 카카오페이 (Spring, Java) With 시퀀스 다이어그램
🌱 포트원 정보 및 설치
포트원 정보 및 설치는 아래 링크를 통해 실행하면 됩니다.
- 포트원 카카오페이 깃헙 : https://github.com/iamport/iamport-manual/blob/master/%EC%9D%B8%EC%A6%9D%EA%B2%B0%EC%A0%9C/sample/kakao.md
- 포트원 사이트 : https://portone.io/korea/ko
포트원, 온라인 비즈니스를 위한 통합 결제 솔루션
코드 한 줄로 세상 모든 방식의 결제를 경험해보세요
portone.io
🌱 포트원 이란?
- 국내 PG결제 연동을 쉽게해주는 결제 API 입니다.
- PG란 Payment gateway의 약자인데, 신용카드사와 직접 계약하기 어려운 가맹점을 대신해 결제와 정산 업무를 대행해 주는 업체입니다.
- PG사와 계약을 하면 카드결제, 휴대폰 결제, 계좌이체, 무통장입금 등 다양한 결제 수단을 쇼핑몰 방문 고객에게 제공할 수 있습니다.
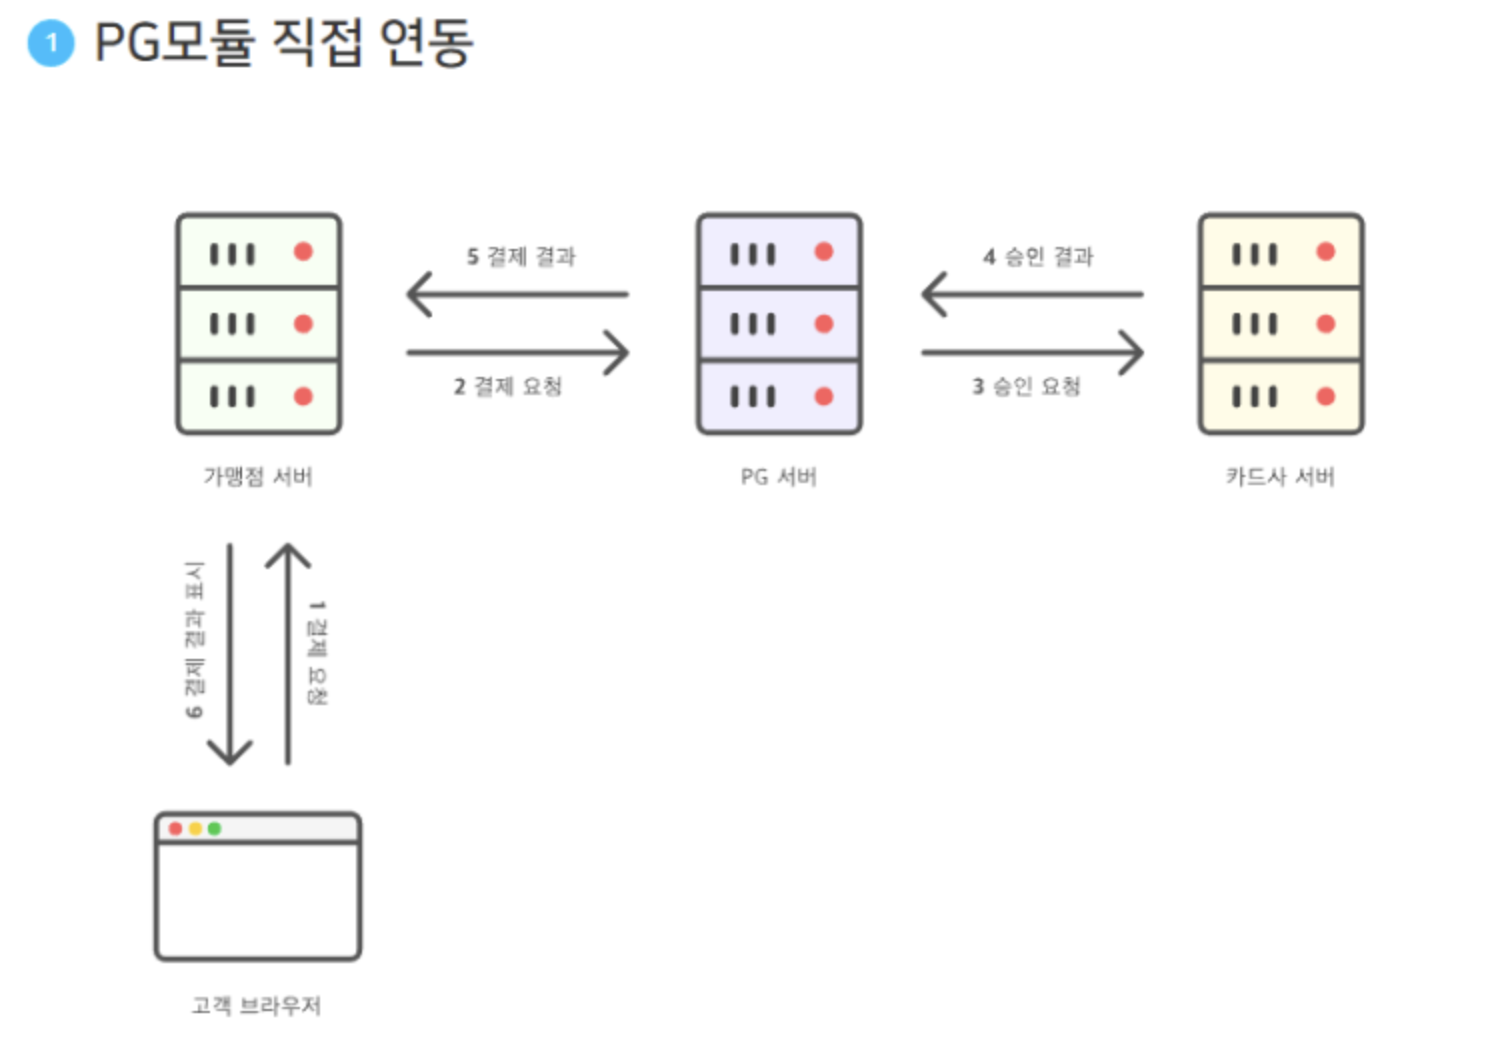
- 포트원을 사용안하게 되면 아래 처럼 PG사와 직접 연동을 하는 단계를 거쳐야 됩니다.

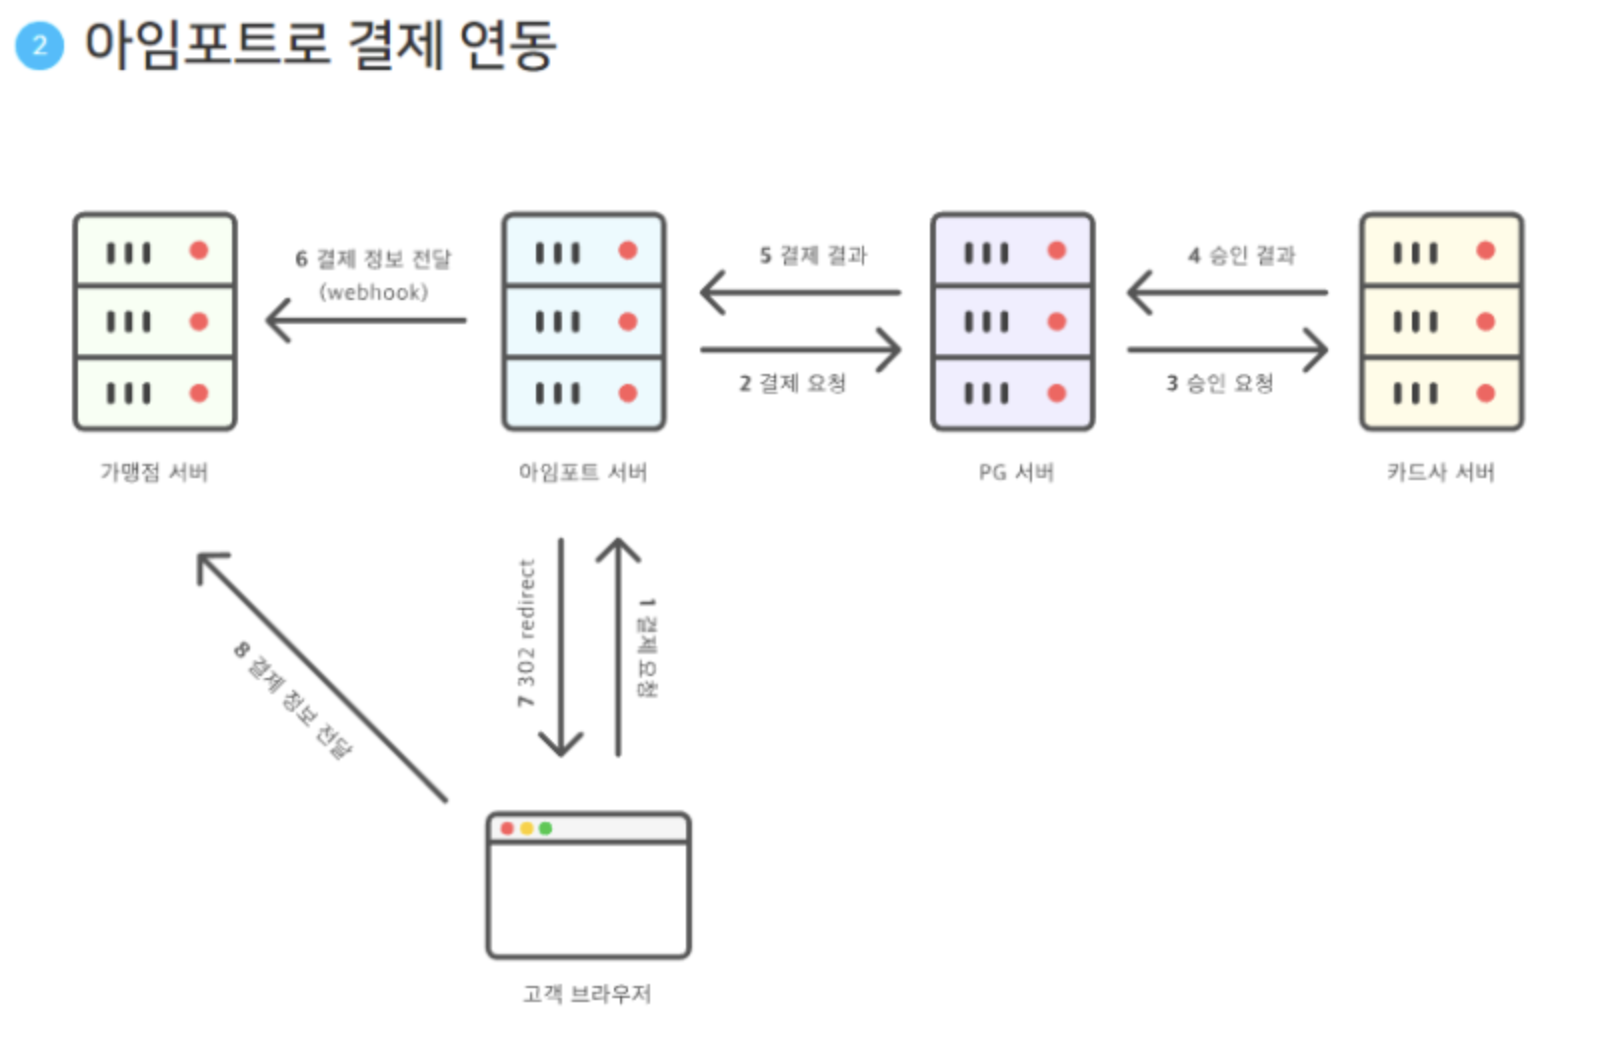
- 하지만 포트원을 사용하게 되면 이미 구현돼 있는 api를 통해 손쉽게 결제 요청,응답이 가능하게 됩니다. 다만 유저가 스크립트 조작을 통해 가격을 변동시켰을 때를 대비해서 "아임포트 서버에서 결제된 내역과 실제로 결제했을 때 출금된 정보 & 아임포트 서버에서 결제된 내역과 내DB에서 물건가격 정보" 2가지를 비교해줘야 한다는 점이 있습니다.

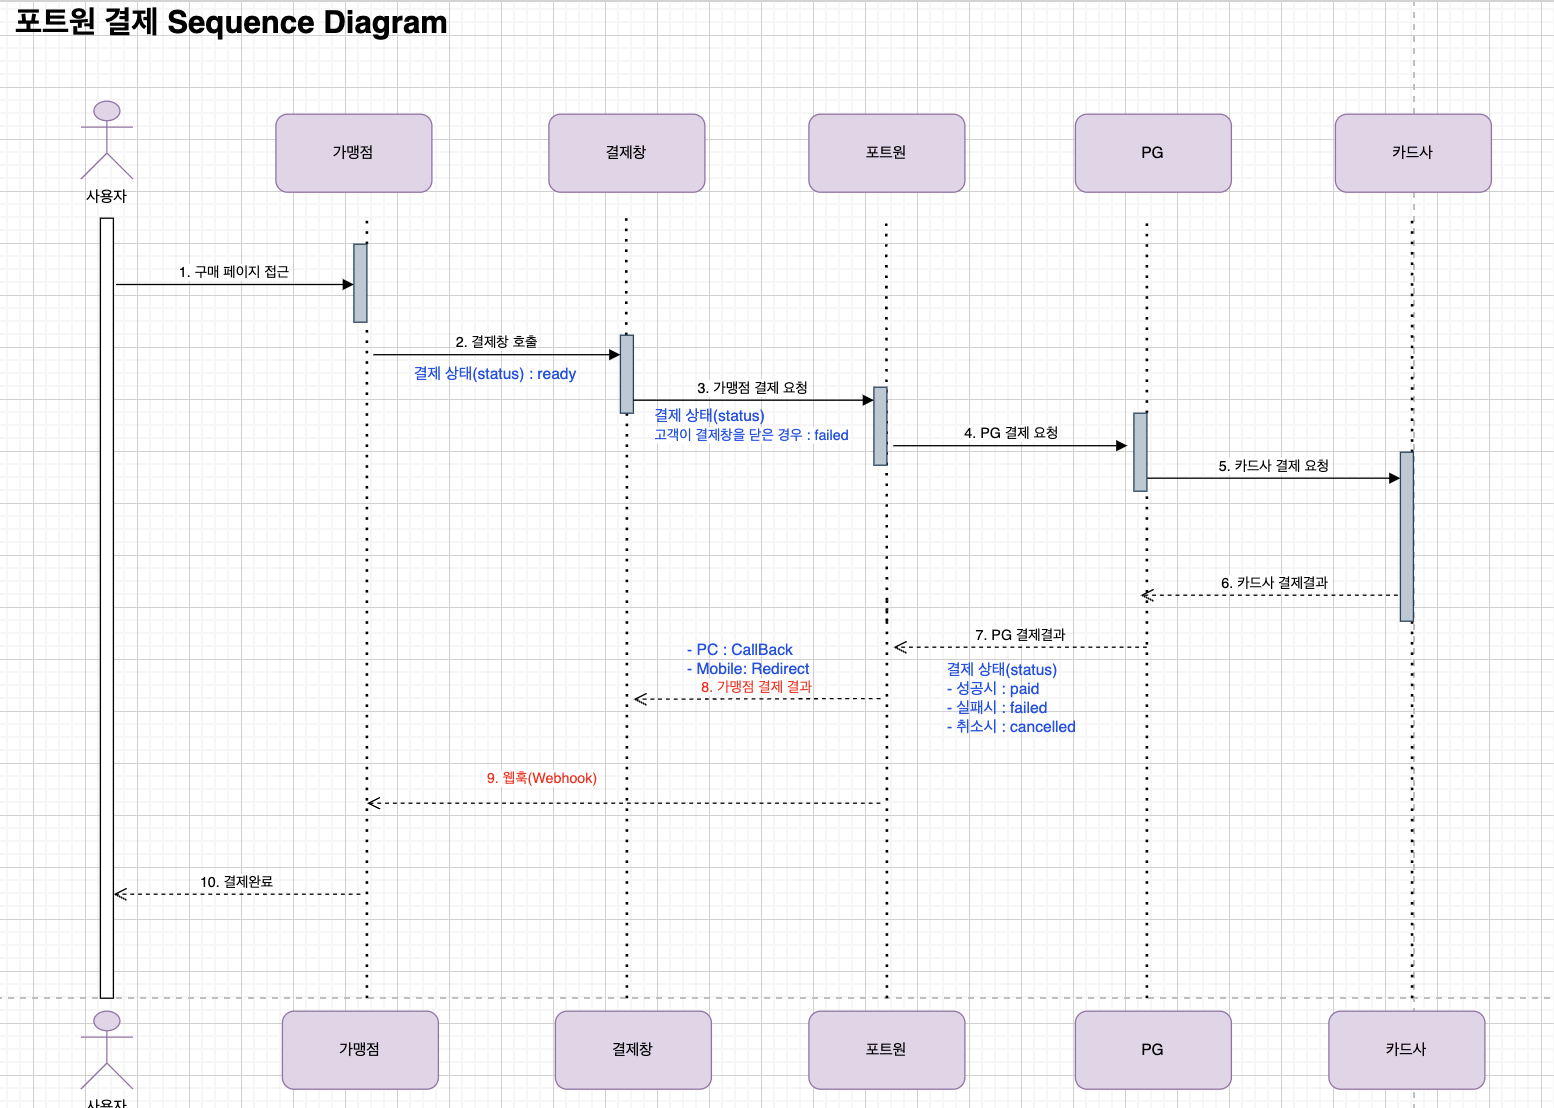
🌱 포트원 결제 Sequence Diagram
- 포트원 결제 시스템을 사용할 때 시퀀스 다이어그램을 정리해봤습니다.
- 포트원은 웹훅(WebHook)을 통해 결제, 가상계좌 발급, 가상계좌 입금등의 서비스가 이뤄질때 마다 엔드포인트로 결제고유 id와 요청한 결제id를 수신할수 있게 해줍니다.
- <단어 정리>
- Endpoint, 엔드포인트 : API가 서버에서 리소스에 접근할 수 있도록 가능하게 하는 URL
- 웹훅(WebHook) : 웹훅은 우리가 데이터를 요청하지 않아도, 필요할 때 알아서 데이터를 줍니다. 저 '필요할 때'를 trigger라고 합니다. 미리 이벤트를 지정해두고, 이 이벤트가 일어나면 내게 데이터를 보내줘! 하는 것입니다..웹훅은 서버에서 특정 이벤트가 발생했을 때, 클라이언트를 호출하는 방식으로써 역방향 API라고도 불립니다. 이렇게 서버측에서 클라이언트의 어떤 URL로 데이터를 보낼지 정해놓은 주소를 바로 Callback URL이라고 부릅니다.

🌱 build.gradle
- dependencies에 추가해줍니다.
// 아임포트 결제
	allprojects {
		repositories {

			maven { url 'https://jitpack.io' }
		}
	}
	implementation 'com.github.iamport:iamport-rest-client-java:0.2.21'
🌱 pay.html
- Javascript에서 사용할 라이브러리를 추가해주세요.
<!-- jQuery -->
<script type="text/javascript" src="https://code.jquery.com/jquery-1.12.4.min.js"></script>
<!-- iamport.payment.js -->
<script type="text/javascript" src="https://cdn.iamport.kr/js/iamport.payment-1.2.0.js"></script><!DOCTYPE html>
<html>
<head>
<meta charset="UTF-8">
<title>Insert title here</title>
<!-- jQuery -->
<script type="text/javascript" src="https://code.jquery.com/jquery-1.12.4.min.js"></script>
<!-- iamport.payment.js -->
<script type="text/javascript" src="https://cdn.iamport.kr/js/iamport.payment-1.2.0.js"></script>
<script src="/js/practice.js"></script>
</head>
<body>
<div class="card text-center">
<div class="card-body">
<h5 class="card-title mb-4">결제하기😎😎</h5>
<input type="button" value="결제하기" onclick="requestPay()">
</div>
</div>
</body>
</html>
🌱 pay.js
- 결제창 호출 코드를 작성합니다.
/*<![CDATA[*/
    let price= 778008;


    console.log(price);

    const IMP = window.IMP;
    IMP.init("IMP번호를 적어주세요.");


    function requestPay() {

        IMP.request_pay({
            pg: "kakaopay.TC0ONETIME",
            pay_method: "kakaopay",
            merchant_uid: 'patient_' + new Date().getTime(),
            name: '병원비 내기',
            amount: price,
            reservationId:32,
            hospital_name: "차앤박 병원",
            patient_name: "watch",

        }, function (rsp) { // callback
                   if (rsp.success) {// 결제성공시 로직
                       let data = { // request
           				imp_uid:rsp.imp_uid,
           				amount:rsp.paid_amount,
           				reservationId: 32
           			};
                       //결제 검증
                       $.ajax({
           				type:"POST",
           				url:"/patient/vertifyIamport",
           				data:JSON.stringify(data),
           				contentType:"application/json; charset=utf-8",
           				dataType:"json",
           				success: function(result) {
           					alert("결제 및 결제 검증이 완료되었습니다.");
           					//self.close();
           				},
           				error: function(result){
           					alert(result.responseText);

           				}
           			});

                   } else {// 결제 실패 시 로직
           			alert("결재 실패");
           			//alert(rsp.error_msg);
           			//console.log(rsp);
         }
       	});
       }//requestPay

    /*]]>*/
🌱 PaymentsApiController
- 포트원 사이트에서 부여받은 apiKey와, apiSecret을 적어주세요.
- 크게 두가지 메서드가 있습니다.
- 1. 결제내역 조회
- 2. 결제 검증
- 결제가 정상적으로 완료되었다면 해당 결제건이 내가 요구한 결제정보와 일치하는가 확인을 해야합니다.
포트원 측에서 수신한 정보와 DB에 존재하는 데이터를 비교해 유효한 데이터일 경우 결제완료처리를 하면 포트원을 이용한 결제가 끝나게 됩니다.
package com.smartChart.PayController;


import com.siot.IamportRestClient.IamportClient;
import com.siot.IamportRestClient.exception.IamportResponseException;
import com.siot.IamportRestClient.response.IamportResponse;
import com.siot.IamportRestClient.response.Payment;
import com.smartChart.Pay.PaymentService;
import com.smartChart.Response.Message;
import lombok.RequiredArgsConstructor;
import lombok.extern.slf4j.Slf4j;
import org.springframework.beans.factory.annotation.Autowired;
import org.springframework.http.HttpStatus;
import org.springframework.http.ResponseEntity;
import org.springframework.web.bind.annotation.PostMapping;
import org.springframework.web.bind.annotation.RequestBody;
import org.springframework.web.bind.annotation.RequestMapping;
import org.springframework.web.bind.annotation.RestController;

import java.io.IOException;
import java.util.Map;

@Slf4j
@RestController
@RequiredArgsConstructor
@RequestMapping("/patient")
public class PaymentsApiController {


    @Autowired
    private PaymentService paymentService;

    //토큰 발급을 위해 아임포트에서 제공해주는 rest api 사용.(gradle로 의존성 추가)
    private final IamportClient iamportClientApi;


    //생성자로 rest api key와 secret을 입력해서 토큰 바로생성.
    public PaymentsApiController() {
        this.iamportClientApi = new IamportClient("apiKey 적어주세요.",
                "apiSecret을 적어주세요.");
    }


    /**
     * impUid로 결제내역 조회.
     * @param impUid
     * @return
     * @throws IamportResponseException
     * @throws IOException
     */
    public IamportResponse<Payment> paymentLookup(String impUid) throws IamportResponseException, IOException {
        return iamportClientApi.paymentByImpUid(impUid);
    }


    /**
     * 결제검증을 위한 메서드
     * map에는 imp_uid, amount, reservationId 이 키값으로 넘어옴.
     * @param map
     * @return
     * @throws IamportResponseException
     * @throws IOException
     */
    @PostMapping("/vertifyIamport")
    public ResponseEntity<Message> verifyIamport(@RequestBody Map<String,String> map) throws IamportResponseException, IOException{
        String impUid = map.get("imp_uid");//실제 결제금액 조회위한 아임포트 서버쪽에서 id
        int reservationId = Integer.parseInt(map.get("reservationId")); //DB에서 예약 가격 조회를 위한 번호
        int amount = Integer.parseInt(map.get("amount"));//실제로 유저가 결제한 금액

        //아임포트 서버쪽에 결제된 정보 조회.
        //paymentByImpUid 는 아임포트에 제공해주는 api인 결제내역 조회(/payments/{imp_uid})의 역할을 함.
        try {
            IamportResponse<Payment> irsp = paymentLookup(impUid);
            paymentService.verifyIamportService(irsp, amount, reservationId);

            Message successMessage = new Message();
            successMessage.setCode(200);
            successMessage.setMessage("성공");

            return ResponseEntity.ok(successMessage);
        } catch (RuntimeException e) {
            Message errorMessage = new Message();
            errorMessage.setCode(500);
            errorMessage.setMessage("실패: " + e.getMessage());
            return ResponseEntity.status(HttpStatus.INTERNAL_SERVER_ERROR)
                    .body(errorMessage);
        }
    }


}
🌱 PaymentService
- Service에서는 포트원 서버쪽 결제내역과 DB에 물건가격을 비교합니다.
- 포트원에서 서버쪽 결제내역과 DB의 결제내역의 금액이 같으면 DB에 결제 정보를 저장합니다. (추후 결제 정보를 확인하기 위해)
- 다를 경우, 예외를 발생시켰습니다.
- irsp : 포트원의 결제 내역 조회 정보입니다.
- reservationId : DB에서 물건가격 알기 위한 번호입니다.
package com.smartChart.Pay;


import com.siot.IamportRestClient.response.IamportResponse;
import com.siot.IamportRestClient.response.Payment;
import com.smartChart.cost.service.TreatmentStatementService;
import com.smartChart.reservation.entity.Reservation;
import com.smartChart.reservation.repository.ReservationRepository;
import com.smartChart.reservation.service.ReservationService;
import lombok.RequiredArgsConstructor;
import lombok.extern.slf4j.Slf4j;
import org.springframework.stereotype.Service;
import org.springframework.transaction.annotation.Transactional;

@Slf4j
@Service
@RequiredArgsConstructor
public class PaymentService {

    private final TreatmentStatementService treatmentStatementService;

    private final ReservationService reservationService;

    private final ReservationRepository reservationRepository;


    /**
     * 아임포트 서버쪽 결제내역과 DB에 물건가격을 비교하는 서비스.
     * 다름 -> 예외 발생
     * 같음 -> 결제정보를 DB에 저장
     * @param irsp (아임포트쪽 결제 내역 조회 정보)
     * @param reservationId (내 DB에서 물건가격 알기위한  번호)
     */
    @Transactional
    public void verifyIamportService(IamportResponse<Payment> irsp, int amount, int reservationId) {
         Reservation reservation = reservationService.findById(reservationId); // 예약 정보
         int sum = treatmentStatementService.selectByReservationId(reservationId); // sum 정보


        //실제로 결제된 금액과 아임포트 서버쪽 결제내역 금액과 같은지 확인
        //이때 가격은 BigDecimal이란 데이터 타입으로 주로 금융쪽에서 정확한 값표현을 위해씀.
        //int형으로 비교해주기 위해 형변환 필요.

        if(irsp.getResponse().getAmount().intValue()!=amount) {
            log.info("##########결제된 금액과 아임포트 서버 내역의 금액이 다릅니다.");
            throw new RuntimeException("결제된 금액과 아임포트 서버 내역의 금액이 다릅니다.");
        } else if (amount!=sum){
            log.info("##########결제된 금액과 Database 서버 내역의 금액이 다릅니다.");
            throw new RuntimeException("결제된 금액과 Database 서버 내역의 금액이 다릅니다."); //DB에서 물건가격과 실제 결제금액이 일치하는지 확인하기. 만약 다르면 예외 발생시키기.!
        } else {
            //아임포트에서 서버쪽 결제내역과 DB의 결제 내역 금액이 같으면 DB에 결제 정보를 삽입.
            reservation = reservation.toBuilder()
                    .amount(amount)
                    .build();
            reservationRepository.save(reservation);
        }

    }


}
'Spring' 카테고리의 다른 글
| Let's Encrypt와 Nginx로 HTTPS 만들기 (1) | 2023.12.17 |
|---|---|
| JWT 토큰 소개와 Spring Security + JWT 코드 공유 (0) | 2023.09.15 |
| Kakao 로그인(OAuth 2.0) in Spring Boot With 시퀀스 다이어그램 (0) | 2023.09.12 |
| Spring - OAuth2.0 + Social Login (0) | 2023.08.22 |
| Spring - web-socket (0) | 2023.08.06 |
